因爲手上有幾顆2.5“的HDD,我的計劃是用這些HDD來安裝Ubuntu來使用。
好幾天下班時間幾乎都在試如何在Macbook機器上可以用外接USB磁盤磁碟來做Ubuntu的multi-boot。令人沮喪的事,每次都失敗在開機按‘Option’都無法出現Ubuntu的開機選項。
終於今天找到這一篇文章,主要是如何制作MacOS所需要的HFS+格式在boot section的partition,這是非常重要的步驟,因爲Macbook的EFI只認得HFS+的format,我們必須手動來安裝與修正。
這是成果,太棒了!

分享執行細節,這是大部分翻譯原作者的文章:
我只想要的只是:
1. 一個安裝了Ubuntu 16.04 LTS的USB disk
2. 可以從任何一台Mac機啟動,只需在啟動後立即按住“Option”(或“alt”)鍵即可,
3. 不會弄亂原Macbook的local HDD。
在互聯網上的所有可用博客上嘗試了數十種解決方案後,我終於找到了為我工作的解決方案! 我必須感謝Jason Heeris他的教程:“ UBUNTU + MAC:PURE EFI BOOT ”,他解釋瞭如何使用純EFI啟動在Mac上安裝Ubuntu。本指南將包含他的說明部分,如果您希望在USB(或外部硬盤驅動器)上安裝完整的Ubuntu安裝,而不需要更動Mac的硬盤,這是個非常好的方法。
注意:
即使這個過程應該讓你的Mac的硬盤完好無損(這是我的情況),我強烈建議備份你的數據,並準備好一個OS X恢復usb,以防萬一出了問題,而且事情常常出錯。對於丟失的數據或無法啟動的Mac,我不承擔任何損害的責任。
設備:
1. Macbook (顯然是)
2. 一個帶有Ubuntu安裝程序的USB記憶棒(這裡的說明),
3. 你要安裝Ubuntu的U盤(or HDD)。
Ubuntu安裝:
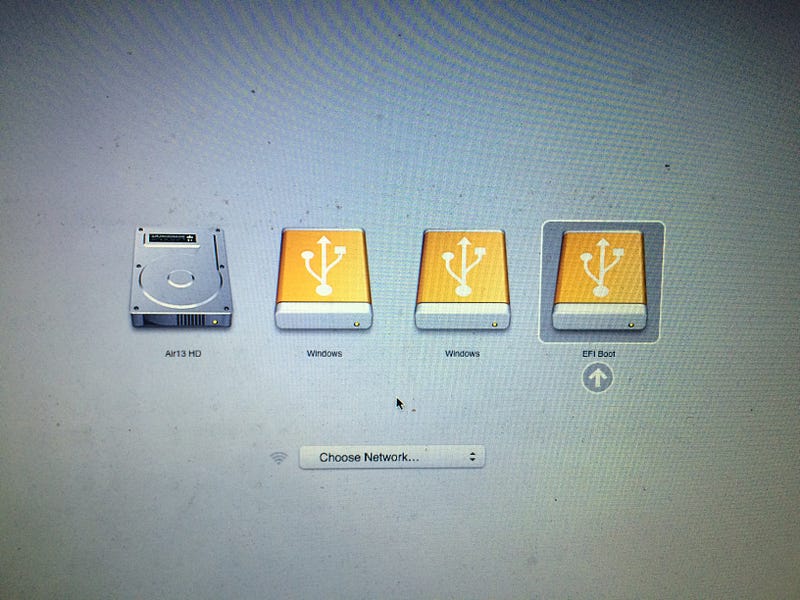
關閉Mac,在按住“Option”或“alt”鍵的同時插入安裝USB卡和電源,直到啟動菜單出現。你應該看到這樣的東西:
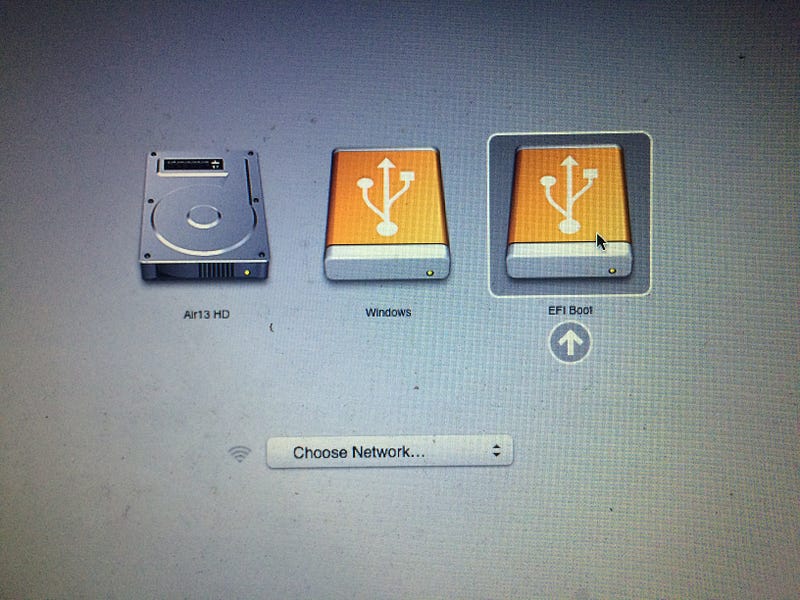
選擇EFI Boot,然後按Enter鍵。您將看到一個GRUB引導程序菜單:
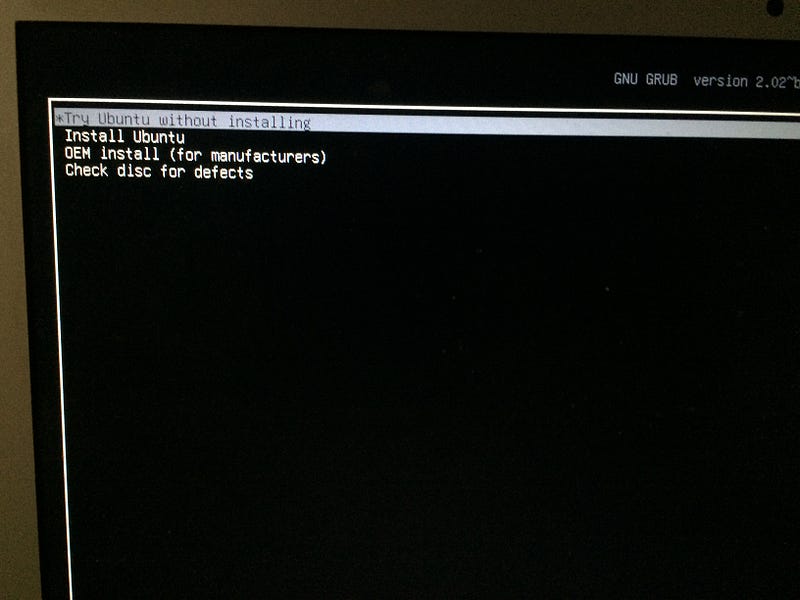
選擇安裝“Try Ubuntu without installing”,然後按Enter鍵。一旦Ubuntu的試用版本完全啓動進入桌面,再插入要安裝Ubuntu的U盤,打開終端(Terminal)並運行以下命令:
ubiquity --no-bootloader
Ubuntu安裝程序將會出現。這是重要的一步,如果您從桌面圖標啟動Ubuntu安裝程序,或者從之前的GRUB引導加載程序菜單中選擇“安裝Ubuntu”,安裝將取代Mac的默認引導加載程序。您必須使用“ - no-bootloader”選項通過終端啟動安裝程序。
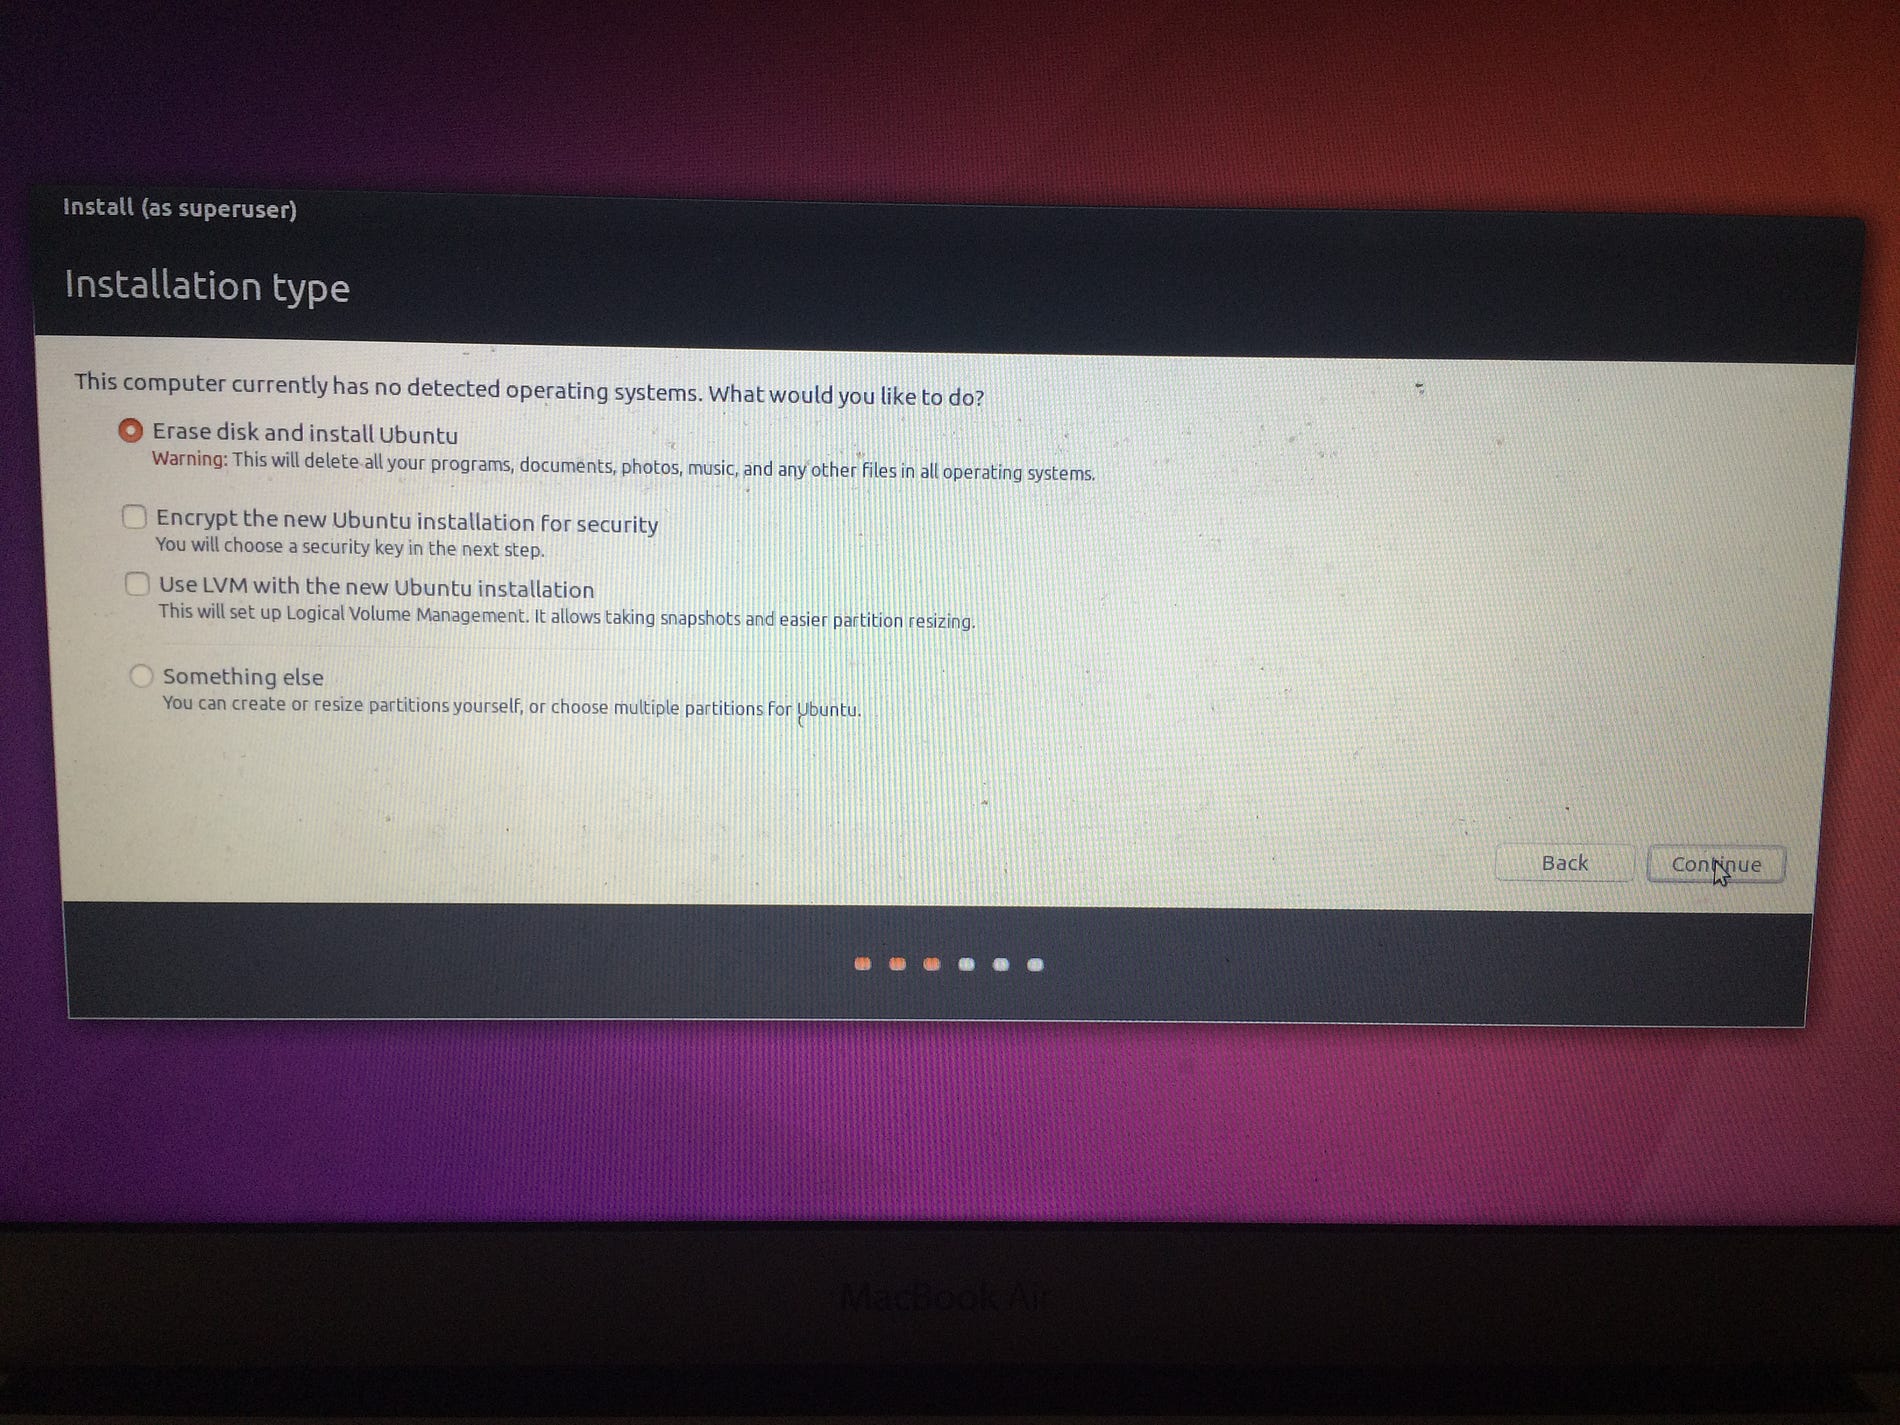
繼續正常的安裝步驟:選擇您的語言,選擇是否要安裝第三方軟件bla bla ...您可能會提示,然後提示您是否要卸載目標USB驅動器的任何分區,然後再訪問這一步,如果發生,點擊“是”。最後到達“安裝類型”屏幕。選擇“擦除磁盤並安裝Ubuntu”:
點擊“繼續”,現在非常小心選擇正確的驅動器。在“選擇驅動器”下,您應該找到並選擇您的目標USB硬盤,在我的情況下“sdd”。如果選擇內部硬盤驅動器(通常是“sda”),您將清除所有的OS X安裝和數據。
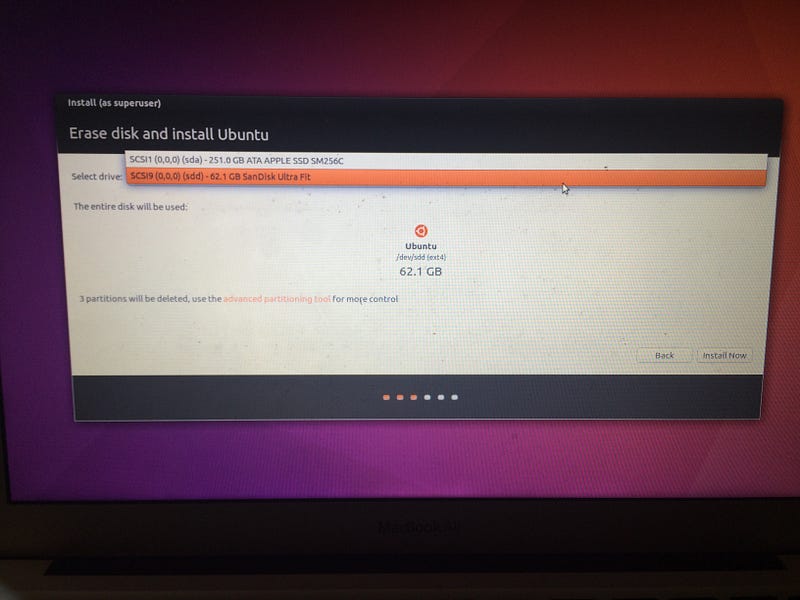
選擇USB硬盤後,可以點擊“立即安裝”。將出現如下消息:
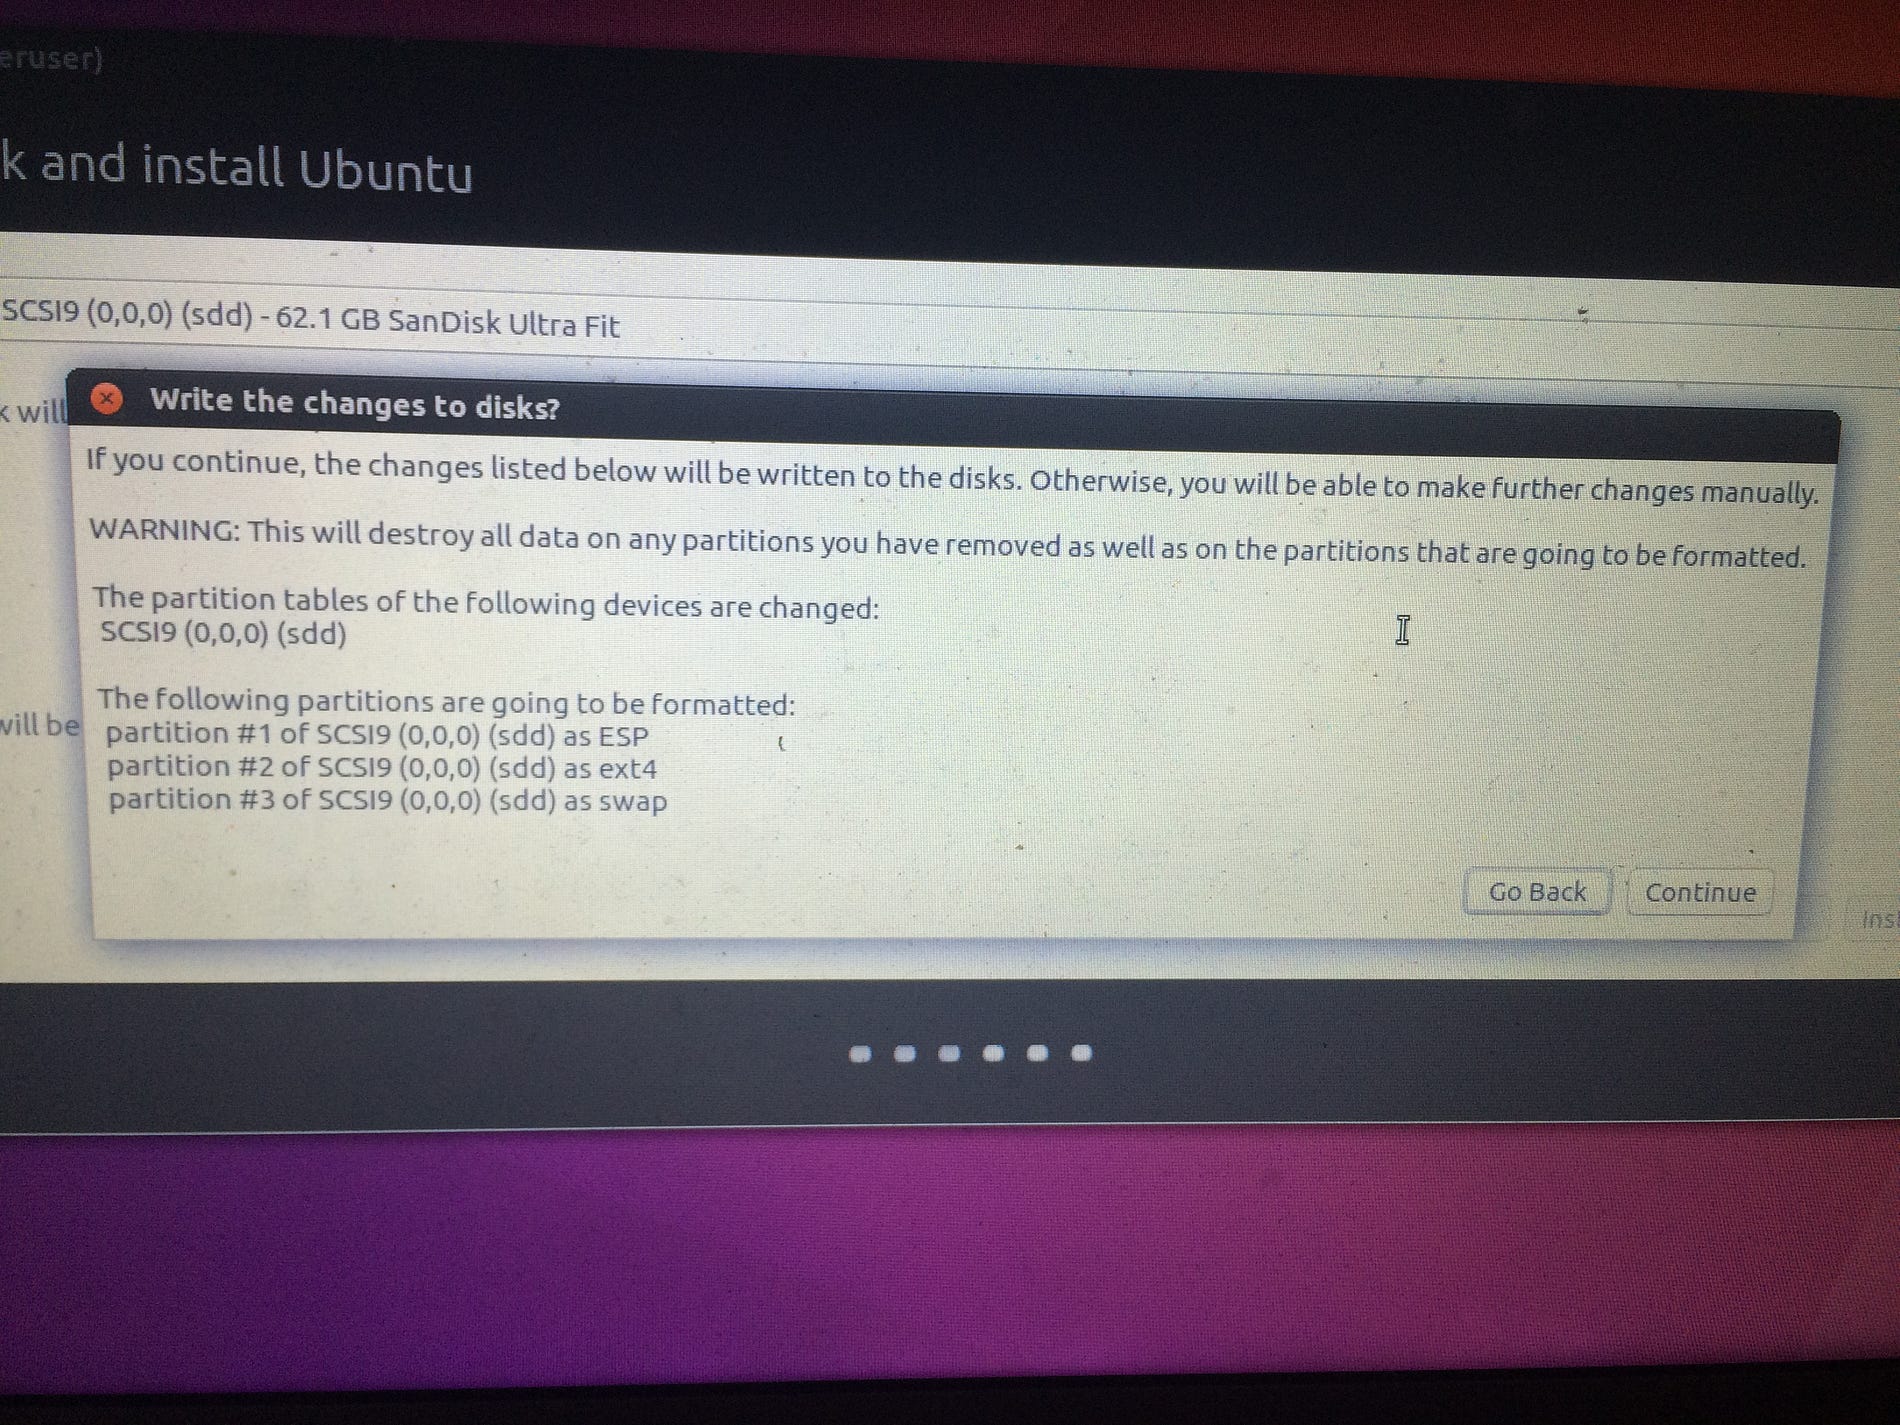
仔細檢查只指定“sdd”(或任何您的USB驅動器的名稱),然後單擊“繼續”。在安裝的以下和最後一步中,您必須選擇您的用戶名,密碼以及是否希望您的主文件夾加密(如果要在Ubuntu主文件夾中存儲機密數據,建議您使用)。最後點擊“繼續”,等待安裝完成,需要一些時間。一旦完成,您可以重新啟動系統。Ubuntu可能在嘗試重新啟動時會卡住,至少這是我的情況,只需按住電源按鈕,直到您的Mac關機。
此時您的Ubuntu安裝已完成,但您無法從其啟動。但不要絕望,我們將按照Jason Heeris的指示解決這個問題。
手動啟動:
在保持兩個USB碟(Installer & 應用)插入的同時,按住“Option”或“alt”鍵打開機器,直到出現啟動菜單,就像以前一樣。您應該看到Mac的啟動菜單,其中包含以下選項:
再次選擇“EFI Boot”,然後按Enter鍵從Ubuntu安裝程序USB重新啟動,並進入上一個GRUB引導加載程序菜單。不要選擇任何條目。而是按“c”鍵打開GRUB控制台。現在你應該看一個GRUB控制台:
grub>
在GRUB控制台,做:
grub> ls
(memdisk) (hd0) (hd1) (hd1,gpt3) (hd1, gpt2) (hd1,gpt1) ...
開始用下面方法找出已經安裝Ubuntu的U盤,我的經驗是用/home裏面是否有‘regis’來辨識是否安裝Ubuntu
grub> ls (hd2,gpt2)/home
regis/
再多找一個確定,
grub> ls (hd2,gpt2)/boot/grub
unicode.pf2 ...
找到了!如果您使用的partition,則啟動文件夾應與主目錄位於同一partition中。
現在,您需要將其設置為您的root的命令:
grub> set root=(hd2,gpt2)
然後您需要找出U盤的UUID:
grub> ls -l (hd2,gpt2)
        Partition hd2,gpt2: Filesystem type ext* 〈...snip...〉 UUID e86c20b9-83e1-447d-a3be-d1ddaad6c4c6 - Partition start at [...]
注意UUID字符串!你們會有所不同。現在告訴GRUB Linux在哪裡:grub> linux /boot/vmlinuz〈...tab here!...〉.efi.signed root=UUID=〈the UUID from above〉
GRUB控制台可以執行‘Tab'查找文檔名,所以如果您輸入vmlinuz部分並按‘Tab’key,可以容易找出文檔名,而不必輸出整個文件名。但請確保.efi.signed的位置! 當然,很長UUID是你必須自己手動輸入。。。XD現在設置initrd(初始RAM磁盤):
grub> initrd /boot/initrd〈...tab here!...〉
最後輸入:grub> boot
這裏就立即用U盤進入安裝好的Ubuntu,接下來就是需要手動修改EFI的部分。
Fixing the EFI partition
So why is the system unbootable? The problem is that the Mac bootloader expects the EFI partition to be formatted as HFS+, the typical Mac filesystem. It also expects certain files to be present. The Ubuntu installer actually formats it as VFAT and doesn’t create the files that are necessary for booting on a Mac.
The first thing you’ll need to do is to install some extra utilities. Fire up the Terminal and enter:
$ sudo add-apt-repository ppa:detly/mactel-utils
[...]
 Utilities for Intel based Macs (eg. recent MacBooks, Mac Minis). Includes a
 fan control (macfanctld) and the HFS "bless" utility.
 More info: https://launchpad.net/~detly/+archive/ubuntu/mactel-utils
Press [ENTER] to continue or ctrl-c to cancel adding it
Press enter to add the PPA. Then update your package list and install the necessary utilities:
$ sudo apt-get update
$ sudo apt-get install mactel-boot hfsprogs gdisk grub-efi-amd64
Run the following command to check what is the name of the device where Ubuntu is installed:
$ sudo fdisk -l
[...]
Disk /dev/sdd: 57,9 GiB, ...
[...]
In my case, it is /dev/sdd. We now use gdisk to delete the VFAT partition and create an HFS+ one. gdisk is interactive, and doesn’t write changes to the disk until you tell it to, so don’t panic if you make a mistake. Replace sdd with your USB device name.
$ sudo gdisk /dev/sdd
GPT fdisk (gdisk) version 1.0.1
Partition table scan:
  MBR: hybrid
  BSD: not present
  APM: not present
  GPT: present
Found valid GPT with hybrid MBR; using GPT.
Command (? for help):
Print the partition table and confirm that the first partition has type EF00:
Command (? for help): p
Disk /dev/sdd: ...
[...]
Number  Start (sector)  End (sector)  Size     Code   Name
   1         2048         1050623  512.0 MiB   EF00   EFI System Partition
[...]
Now we delete that EF00 partition:
Command (? for help): d
Partition number (1-3): 1
…and create a new HFS+ one in its place:
Command (? for help): n
Partition number (1-128, default 1): 1
Just press enter for the first and last sector options:
First sector (34-121307102, default = 2048) or {+-}size{KMGTP}:
Last sector (2048-1050623, default = 1050623) or {+-}size{KMGTP}:
…but enter AF00 for the filesystem code:
Current type is 'Linux filesystem'
Hex code or GUID (L to show codes, Enter = 8300): AF00
Changed type of partition to 'Apple HFS/HFS+'
Now we’re ready to write the changes. Use the p command to double-check your changes, and then w to write:
Command (? for help): w
Final checks complete. About to write GPT data. THIS WILL OVERWRITE EXISTING
PARTITIONS!!
Do you want to proceed? (Y/N): Y
OK; writing new GUID partition table (GPT) to /dev/sdd.
Warning: The kernel is still using the old partition table.
The new table will be used at the next reboot.
The operation has completed successfully.
Now we have an unformatted HFS+ partition. We can format it with (replace sdd with your USB device name):
$ sudo mkfs.hfsplus /dev/sdd1 -v Ubuntu
Initialized /dev/sdd1 as a 512 MB HFS Plus volume
For system partitions (eg. /, /boot, /boot/efi) Ubuntu uses the UUID (universally unique identifier) of a disk partition to mount it (rather than the device node, eg. /dev/sdd1). This means we need to update /etc/fstab:
$ sudoedit /etc/fstab
This will launch the nano text editor. Look the two lines that refers to /boot/efi:
# /boot/efi was on /dev/sda1 during installation
UUID=C59D-1B30  /boot/efi       vfat    defaults        0       1
Use ↓/↑ to position the cursor at the start of these lines and hit ctrl+K to delete them. Press ctrl+X and then Y to save and exit nano. Now, check that no partition is mounted on /boot/efi by running:
$ mount | grep /boot/efi
/dev/sda1 on /boot/efi ...
In my case, sda1 was mounted on /boot/efi. Unmount /dev/sda1:
$ sudo umount /dev/sda1
Then run this to add the necessary entries to your fstab file, replacing sdd with your USB device name:
$ sudo bash -c 'echo UUID=$(blkid -o value -s UUID /dev/sdd1) /boot/efi auto defaults 0 0 >> /etc/fstab'
Test it out by remounting /boot/efi:
$ sudo mount /boot/efi
Note that you shouldn’t use extra options here. If it doesn’t work from that command alone, it means your /etc/fstab entry is wrong.
If you run the previous command you should see your USB partition mounted on /boot/efi:
$ mount | grep /boot/efi
/dev/sdd1 on /boot/efi ...
Now we’ll reinstall GRUB so it can use the newly formatted HFS+ partition for its EFI data. First, create the necessary directory on the EFI partition:
$ sudo mkdir -p "/boot/efi/EFI/$(lsb_release -ds)/"
The $(lsb_release -ds) part automatically produces a label for the distribution like Ubuntu 16.04 LTS.
Now, there’s a bug in GRUB that means that on HFS+ it requires a file named mach_kernel to exist in a particular place before it runs. In fact, it’s really the Mac bootloader that requires this file, but GRUB seems to look for it in the wrong place and refuses to run if it’s not there, so we need to create it twice:
$ sudo bash -c 'echo "This file is required for booting" > "/boot/efi/EFI/$(lsb_release -ds)/mach_kernel"'
$ sudo bash -c 'echo "This file is required for booting" > /boot/efi/mach_kernel'
Now we need to install GRUB, and we need to be a bit explicit about where it should put its files:
$ sudo grub-install --target x86_64-efi --boot-directory=/boot --efi-directory=/boot/efi --bootloader-id="$(lsb_release -ds)"
We then need to “bless” the bootloader code, so that the Mac bootloader will boot it:
$ sudo hfs-bless "/boot/efi/EFI/$(lsb_release -ds)/System/Library/CoreServices/boot.efi"
The final step is to create the grub configuration:
$ sudo sed -i 's/GRUB_HIDDEN/#GRUB_HIDDEN/g' /etc/default/grub
$ sudo sed -i 's/GRUB_TIMEOUT=10/GRUB_TIMEOUT=0.1/' /etc/default/grub
$ sudo grub-mkconfig -o /boot/grub/grub.cfg
The system should now be bootable!
Let’s just finish by adding the Ubuntu icon that will be displayed at boot. Simply do:
$ sudo apt-get install mactel-boot-logo
$ sudo cp /usr/share/mactel-boot-logo/ubuntu.icns /boot/efi/.VolumeIcon.icns
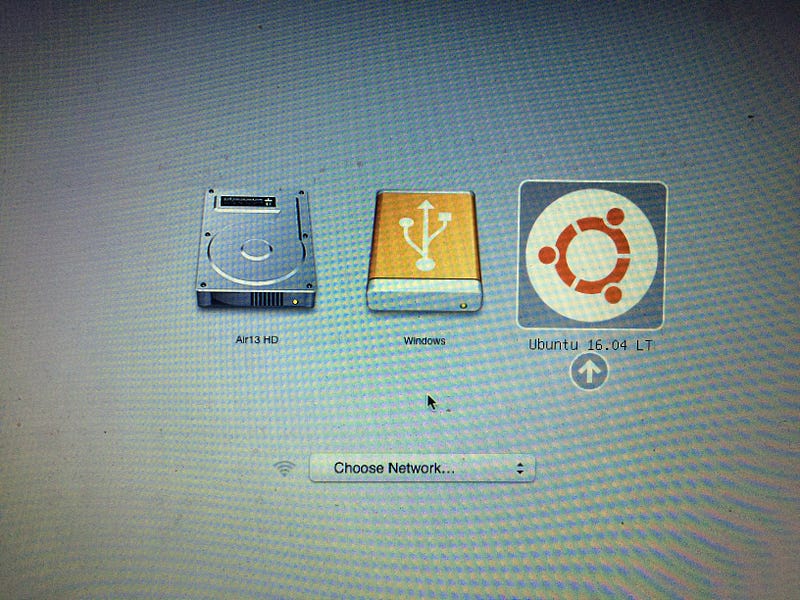
Reboot your system, press and hold the “option”/“alt” key and you should finally be able to boot Ubuntu from your USB key!
If you don’t press and hold the “option”/“alt” key at startup it should boot directly into OS X as usual. However the second time I went through all this process I’m not sure what I did wrong or what was different from the first time and by default my Mac was booting into Ubuntu. If it is also your case, try to mount your /dev/sda1 partition and remove the EFI folder in it:
$ sudo mkdir -p /mnt/sda1
$ sudo mount /dev/sda1 /mnt/sda1
$ sudo rm -r /mnt/sda1/EFI
This solved the problem for me. After reboot, OS X was again my default OS.
Final make up
If you are going to keep the USB always inserted, like me, you will notice that when starting OS X, the ESP partition will be automatically mounted. To prevent this, annotate the partition UUID by running from OS X:
$ diskutil info /Volumes/Ubuntu | grep "Volume UUID" | awk 'NF>1{print $NF}'
5F2578EF-237A-3AC9-BC32-0BD4D520A0A7
edit your fstab file by running:
$ sudo vifs
move down until you reach the end of the file, press “o” and paste the following line after replacing the UUID with yours:
UUID=5F2578EF-237A-3AC9-BC32-0BD4D520A0A7 none hfs rw,noauto
Then press “ESC” to exit the editing mode, “:wq” and finally “Enter” to save and exit.
原文參考:
Ubuntu installation on USB stick with pure EFI boot (Mac compatible)
UBUNTU + MAC: PURE EFI BOOT
How to Install Ubuntu 16.04 on a Retina MacBook Pro 11,2
沒有留言:
張貼留言